Saturday, September 20, 2025
Home Blog

Invite Wildlife into Your Backyard In Style

0
big bat box

Imagine transforming your outdoor space into a thriving haven for nature. Big Bat Box makes that dream tangible with a beautifully crafted range of wildlife boxes—bat houses, owl boxes, and bee hotels.  Wildlife in your backyard is not the worst idea in the world.

All designed to support vital local ecosystems while adding a rustic statement to your yard.

These aren’t just functional pieces; they’re a lifestyle choice that marries ecological purpose with thoughtful design.

Eco-Conscious Features

The crafted boxes offer some great features like:

Certified Quality

Many of Big Bat Box’s products carry BCI (Bat Conservation International) credentials and are used in national parks across the U.S. and Europe, underscoring their wildlife-safe design and conservation alignment.

Sustainable Materials

Their boxes are handcrafted.  Often from durable cedar.  They are designed to withstand the elements and last for seasons.

Why You’ll Love It—and Nature Will Too

Depending on which part of the world you are in.  You can enjoy some wildlife in your backyard.  Its a great idea to offer a habitat.

Natural Pest Control

Bats are incredible night-time predators. Each bat can consume its own body weight in insects nightly.  Which provides a natural, Eco-friendly alternative to chemical repellents.

Pollination Power

Their bee houses nurture vital pollinators, helping to keep your flowers blooming and your veggie patches fruitful.

Conservation in Action

By offering shelter to bats, bees, and owls, you’re creating a nurturing environment for wildlife and participating in broader efforts to preserve biodiversity.

wildlife in backyard

Designed for Your Backyard

Stylish Functionality

From the charming Big Bat Barn.  Which is a three-chamber, barn-look bat house—to elegantly crafted owl boxes and bee hotels, each design is built to complement your garden aesthetic while serving nature.

Easy to Install

Shipping includes clear installation guides and, in many models, all necessary hardware—making it simple to mount to walls, poles, or trees.

Proven Success

Customer testimonials rave about rapid occupancy—one buyer noted, “within days the bats took to the box. At last count about 30 bats took up residence.”

Benefits of Having Wildlife in Your Backyard

Creating a wildlife-friendly backyard is one of the most rewarding steps you can take toward living sustainably.

Not only does it transform your garden into a lively and engaging space, but it also supports local ecosystems and promotes a healthier environment.

Here are some of the biggest backyard wildlife benefits:

Natural Pest Control

Encouraging bats, birds, and frogs into your outdoor space provides a natural solution to pests. A single bat can eat up to 1,000 insects in an hour, making them one of the most effective and eco-friendly alternatives to chemical sprays.

Pollination and Stronger Gardens

Bees, butterflies, and certain bat species are vital pollinators. By welcoming them, you’ll enjoy healthier flowers, abundant fruit trees, and thriving vegetable gardens.

Which is an essential step in building an eco-friendly garden.

A Balanced Backyard Ecosystem

Wildlife adds balance to your outdoor environment. Owls naturally control rodent populations, while smaller pollinators ensure plant diversity and growth. Each species plays a role in keeping your backyard ecosystem strong and resilient.

Enjoyment and Education

Having wildlife in your backyard creates endless opportunities to observe, learn, and enjoy nature firsthand. It’s a simple way to connect with the outdoors daily and an inspiring way to teach children about the importance of supporting biodiversity.

Helping Conservation Efforts

As natural habitats shrink, your backyard can become a sanctuary. By installing wildlife houses, planting native species, and offering water sources, you’re directly helping local wildlife populations survive and thrive.

wildlife habitats

Tips for Welcoming Wildlife Successfully

Not all backyards are created equal. To ensure success, remember the following:

Sunlight Matters

Aim to install bat houses on south- or east-facing walls, at least 10–12 feet high, so they receive morning sun and keep warm.

Check Your Location

Bats won’t show up if your yard is too far from water, greenery, or insect populations. Homes in highly suburban settings might not attract wildlife as effectively.

Attracting Residents

Patience pays off. If the habitat’s right, bats are likely to come—but it might take time and the right conditions to entice them.

Our Final Thoughts

Big Bat Box isn’t just a retailer.  It’s part of a growing movement toward backyard sustainability and intentional living.

Their products offer a beautiful and practical way to invite wildlife into your life while contributing positively to local ecosystems.

  • Stylish designs that elevate your outdoor space
  • Wildlife-safe, eco-conscious materials and certifications
  • Real-world success, backed by positive testimonials
  • Conservation-minded mission aligning with lifestyle values

Having wildlife in your  backyard is not the end of the world. With Big Bat Bax you have a chance to create your own backyard eco-system.

Ultimate Guide to the Best Solar Lights For Your Backyard

0
best solar lights

These days trying to light up your outdoor backyard space with electricity from the grid, will kill your wallet. Homeowners should be considering an alternative energy source that is sustainable and less expensive than electricity from the grid. Solar power is the best alternative for lighting your outdoors. It is not only cost-effective but also eliminates the problem of blackouts. We provide you the ultimate guide to the best solar lights For Your Backyard

What is an outdoor solar light?

Outdoor solar light is a photovoltaic device that uses energy from the sun to light up the outdoor space. The solar energy industry is snowballing as millions of people embrace renewable sources of energy.

How do Solar Lights work?

The concept of converting sunlight into power sounded like science fiction a couple of decades ago.

We have all seen big and small best solar lights in both commercial and residential places. However, many people wonder how these lights turn sunlight into power. So, how do solar lights work?

A solar light comes as a complete unit and has four main components:

  • the solar panel
  • the light fixture
  • battery
  • control electronics

During the day, the solar panel collects sunlight and produces electric energy out of it. The power is either used immediately or stored in a battery for later use.

The reason for finding the best solar lights and installing them is to provide light at night. Therefore, almost all solar lights are attached to a battery.

installing solar lights

Buying the best Solar Lights

When buying solar lights, it is prudent to choose a light that best serves the function you need it to perform.

Outdoor solar lights are divided into four main categories:

  • spotlights
  • floodlights
  • path lights
  • decorative accent lights

Let’s have a look at each one of them.

Path Solar Lights

Path solar lights illuminate walkways, paths, and driveway perimeters in a residential or commercial property.

You have a lot of choice with path lights.  Which means the homeowner has multiple options of placing them.

Property owners can choose lights with hanging hooks, ground stakes, and flange mounts. Path lights have on-off switches, a feature that enables users to save power for a specific event or extend the light’s potential run time.

Some models offer unique features such as timers, colored lenses, and high–low power. The price of path lights varies with their features and light output.

Decorative Solar Accent Lights

Decorative accent lights create an alluring and enjoyable glow for your outdoor space. In most cases, these lights are used to mark a place, such as landscape hazards.

For example, a solar accent light can help show a rock or a step that poses risks to people.

Solar lights are not only used to light up a landscape, but they are also used to softly illuminate low hedges or shrubbery.

Since they have low light output, these lights run for a more extended period than other types of solar lights.

Accent solar lights come with efficient multi-crystalline solar cells that charge in semi-shaded areas or during cloudy days.

Amber LEDs creates a softer ambience and consume less power than white LEDs.

Spotlights And Task Lights

These types of lights are the most expensive and the brightest of all. The best designed solar lights are designed to work best in direct sunlight on entryways, plants, and statuary.

Spotlights and solar task lights are flexible. They can be mounted in multiple ways and adjusted to point a light beam in a specific direction.

path solar lights

Solar Floodlights

As the name suggests, these lights are used to illuminate large spaces such as cities and roads.

Floodlights are also used to illuminate garden spaces due to their high level of brightness.

Tips To Consider When Buying Solar Lights

There are thousands of solar lights units in the market. Therefore, it is overwhelming to choose the right light for your needs. You need to analyze your needs before buying solar lights.

Before heading to the market, ask yourself the following questions.

  • Do you want the best solar lights for decorative purposes?
  • Do you want solar lights for security purposes?
  • Is your goal to illuminate a specific object?
  • What is the size of the area to be illuminated?

Color And Brightness of Lights

All lights serve the same purpose: to light up space. However, some lights have a higher brightness level than others.

If you want to light up a large area, the best solar lights for you would be floodlights or spotlights. These lights should have an output of more than 100 lumens.

On the contrary, decorative lights have a lower brightness level.

Therefore, the suitable brightness level is determined by the purpose of the light. On the other hand, you can opt for lights with the feature of adjusting the brightness level.

When it comes to color, some lights have a single color while others change color. The most suitable color is determined by your interests, needs, or even time of the year.

For example, a floodlight may come in a single color, while decorative lights come in many colors.

Battery Specification

The size of the battery plays a significant role as it determines the number of hours a light can run at night.

That’s said, it is imperative to pay attention to battery specifications when buying solar lights. There are several things to consider about the battery.

First, check the sun hours it takes for the battery to charge fully. It is advisable to choose a battery that needs the lowest sun hours.

Second, check how long the battery can power lights when charged to the fullest. The beter quality kits have a battery that power lights for at least 8 hours.

solar lighting maintenance

Coverage

This aspect is essential, especially when it comes to motion-sensing lights. Security lights have different detection angles and sensing ranges.

If you are buying solar lights for security purposes.  Picking ones with a large sensing angle and senses movement over a long distance is smart.

Other factors such as the size of garden space also influences coverage.

Design and Appearance

You should also consider the design and appearance when buying solar lights. The primary function of lights is to illuminate, but they should also improve curb appeal.

Choose aesthetically alluring lights to enhance the appearance of your outdoor space during the day and night.

How To Install Solar Lights

After choosing the best solar lights for your outdoor space, it’s time to consider where to place your lights.

If you place your lights in the wrong place.  They will get less power from the sun.

Solar will help save some bucks on your electricity bill and reduce your carbon imprint. Just remember these lights won’t serve the intended purpose if you place them improperly.

Let’s look at tips of placement and installation of solar lights to perform at their best.

How To Install Solar Lights For Maximum Efficiency

After deciding what you want to illuminate, you need to find the highest point to install your light.

Placing your best solar lights on high points will increase their ability to collect sunlight. However, don’t install the light too high.

The light should be installed in an accessible place for easier maintenance.

How To Install Solar Lights Without Causing Obstructions

Look for common obstructions when installing your lights. Place the lights in a place where they can’t obstruct lawnmowers or kids.

You don’t want to place your lights where they will obstruct kids when playing or where you can run them over with your car.

Place the best solar lights where they are visible at a distance and where they won’t obstruct the way.

It is wise to create a plan of where you will install your solar lights before making an order.

As said earlier, place the panels away from obstruction. If several lights share one panel, set the panel in a strategic position to collect a large amount of sunlight.

Also, bury the cable in a relatively deep trench and enclose it with a plastic tube for maximum protection.

By concealing the cable at least 6 inches deep, you will avoid accidentally cutting them when digging your backyard.

Additionally, prune tree branched that have over your solar panel and lights.

How to Wall mount

How To Install Solar Lights While Fully Charged

Experts recommend charging them prior to installing.  Your light kit might need 12 to 14 hours of charge before installing them.

If possible, place the lights in direct sunlight for two days to charge as much as possible. Ensuring that they are fully charged before installing them is crucial for them to work at peak performance.

How To Install Solar Lights On The Ground

Some lights come with their own solar panels and stakes that can be inserted on the ground.

If you’re buying lights that come with their own solar panels, you will need to dig a bit deep and place them in a sunny location.

If the ground you’re installing in is hard and compacted.  You will need to prepare the soil since the stakes that come with the lights are not strong enough to penetrate hard surfaces.

Prepare the ground by watering it uniformly to make it soft. You can also opt to soften the ground using a garden fork or a shovel. Soften the soil where you intend to erect your lights or panels that come separately.

Remember how to install solar lights without breaking the stakes. Be extra careful when inserting lights on the hard ground because you might end up damaging your best solar lights.

As soon as you feel the stake is not penetrating through the soil quickly, prepare the ground further by digging or wetting it.

Benefits Of Outdoor Solar Lights

Now that we have looked at what to consider when buying solar lights and how to install solar lights let’s shed more light on the advantages of outdoor solar lights.

Needs Low Maintenance

Besides being durable, solar lights need low maintenance. Their low maintenance can be traced to their limited number of sockets, cables, and other accessories.

Ensure to keep your lights away from shading to improve their efficiency and prolong their lifespan.

In addition, although panels are cleaned by rain, it is recommendable to check for dust, birds’ droppings, and leaves regularly.

Cost-Effective

It goes without saying that outdoor solar lights will help reduce your electricity bills. After buying solar lights and installing them, you will enjoy outdoor lighting without spending a penny.

Although buying solar lights might be relatively expensive, you will recover your investment in the long run.

Path way lighting

Say Goodbye to Blackouts

After learning how to install them, you will be less worried about blackouts. The best solar lights are self-contained units that only need sunlight to illuminate your outdoor space.

As a result, you will enjoy maximum security since thieves mainly break into homes during a blackout or night.

Easy Installation

Most solar panels come as a complete unit, making them easy to install. In addition, their parts have connecting plugs, making it easier to do it yourself.

However installation isn’t as complicated like installing lights using power from the grid.

Its means that you don’t necessarily need to consult a professional to install. You can do it yourself.

With the manual and the tips given above, you are ready to provide light to your backyard.

Installing the best solar lights.  Will ensure you get the most out of the environmentally and economically viable system.

18 Top Backyard Water Activities You Can Enjoy In Summer

0

When summer first starts, many families begin to go outside far more often.  If you have a pool that’s awesome. You don’t need one though.  With a backyard, you have a fantastic way to spend you summer, here are 18 of the top backyard water activities you can enjoy all summer long.

After being cooped up inside for so long, it may take some time before you figure out how to spend your leisure time. As temperatures rise, water-based activities become a must.

backyard water activites for kids

Summer Backyard water activities

PVC Pipe Course

This is one of the top backyard water activities for families that love to express their creativity. You can go to a store and pick up some cheap PVC pipes and other accessories.

You can set up various obstacles courses or forts that keep the whole family cool.

While these can be tons of fun to navigate, the real enjoyment comes from building the structures as a family.

Enhance Your Slip-n-Slide

Horizontal water slides have remained one of the top backyard water activities for many years now.

After a while, the standard slide can become rather stale. Try spicing things up a bit by filling the slide with water balloons.

The person sliding through is sure to get soaking wet and have a blast while doing so.

Water Balloon Baseball

Turn America’s favorite pastime into one of the top backyard water activities by simply swapping out the ball.

Water balloons are a blast to hit and will cool you off if you make contact. You can gather the whole neighboorhood and have a complete game if you like.

To make it even more fun, try to set up slip-n-slides between bases to speed things up a bit.

Catching Water Balloons

Catch can be one of the top backyard water activities if you play it just right. Buy some spare spaghetti strainers from the dollar store and strap them to your heads.

Then, the other players can lob water balloons and try to land them in the strainers. The person catching can bend and maneuver to try and make baskets as well.

The result is a super fun time for those who love getting soaked on a hot day.

The Glowing Pool

This is a great way to end a long day of swimming Get tons of glow sticks and place them in your pool.

This creates some ambient lighting that allows you to keep swimming even in darkness. You can gather your whole family and relax together.

This turns your pool into one of the top backyard water activities you can enjoy at night.

Water Pinatas

If you have tons of things to hang water balloons from in your backyard, then this is a great way to take advantage.

Fill up plenty of balloons and hoist them from tree branches and other perches. Take turns smashing each ballon while soaking everyone in the process.

This is one of the top backyard water activities for letting off some steam.

Outdoor Water Beds

Sometimes, you just want to lounge around on a hot summer day. Creating a makeshift water bed outside is a great way to do just that.

Kids can nap or splash around to their heart’s content while staying cool.

It’s one of the top backyard water activities you can enjoy on days when you don’t have the energy for something more ambitious.

Large Slides

If you live in an area with lots of hills, you can turn them into a water slide. You can purchase a large enough wrap from a hardware store.

You can also order them from specialty suppliers. You lay the roll down the hill and uses sprinklers to provide the water.

This is tons of fun for older kids and adults alike. For even bigger thrills, you can go to a park or rent out a public space and set up a larger slide.

water activities

Hay Bale Pools

If you live on a farm or have access to hay bales, you can use them to create a makeshift pool.

You can arrange them in any formation you want and begin to pump water through. The bales keep the water in place all day long.

You can make a pool large enough for groups way bigger than just your family. This is one of the top backyard water activities and it’s well worth doing at least once.

DIY Dunk Tank

There’s no need to hit up the carnival if you craft your own dunk tank. A basic frame can be made using inexpensive PVC pipes and other supplies.

You also need a large enough bucket so that people get drenched. Everyone takes turns sitting in the tank.

This is a sure way to keep everyone cool on those blistering hot afternoons.

Soda Bottle Sprinkler

This is a fun way to use your old two-liter soda bottles instead of throwing them away. You poke some holes all around the bottle and cover them up with waterproof tape.

Next, you hook the hose up to the mouth of the bottle and start it up. This creates a sprinkler effect that shoots water in all directions.

This is one of the top backyard water activities that the whole family can enjoy together.

Pool Noodle Sprinkler

This is a very similar idea to the water bottle sprinkler. You poke a bunch of holes in the sides of an old pool noodle.

Then, you plug one side with a waterproof seal. Finally, you shove the hose in the other end and let it go.

The pool noodle has a much larger radius than a bottle. You can even hang some from trees to get a full 360-degree effect.

Water Balloon Slingshot

You can use a variety of materials in order to construct a slingshot. You can set up targets and take turns shooting them down.

For some real intense action, you can make two or more slingshots and have a battle. There is no limit to how far this idea can scale.

You can go beyond the family and get the entire neighborhood involved if you have enough willing participants.

Water Gun Target Practice

As the name implies, this is one of those top backyard water activities that requires a collection of water guns.

You can set up a shooting range throughout the yard and take turns navigating through it. If you aren’t afraid to get sprayed, you can even attach a target to yourself.

The easiest way is to take water bottles and cut a big hole in the center. You can either create a bullseye target and cover the whole or leave it empty.

Either way, the next step is to attach it to your head. Finally, the whole family takes turns trying to shoot the bottles.

If you have enough water guns, you can have a more active match with multiple people.

A Classic Water Gun Battle

Before putting the water guns away, you might want to have a traditional water gun battle. You can play tons of different modes depending on how many people you have.

You can either do various free for all matches or team up for larger-scale conflicts. If you have enough space, playing capture the flag is always a favorite.

When it comes to water guns, the only limit to what you can do is your own imagination.

Drip, Drip, Drench

This take on duck, duck, goose involves much more water than the traditional game. Players take turns walking around the circle with a wet sponge.

As they walk past each sitting player, they lightly drip the sponge. At random, they can choose to drench one of the sitters.

This causes a chase just like in traditional duck, duck, goose. This is a great way to stay cool while taking a trip down memory lane.

Frozen T-Shirt Race

One of the best ways to fend off the heat in summer is to get a T-shirt wet and place it in the freezer.

If you have ever done this, you know how challenging it can be to put the shirt back on. This is an excellent opportunity to have some fun with the whole family.

Two or more people can take their frozen shirt out of the freezer at the same time. The first person to put their shirt fully back on is the winner.

It may not sound like much, but you will be surprised how much fun it gets when you play with multiple people.

Kiddie Pool Kickball

If you’re getting too hot to play kickball, you can always grab some kiddie pools. Swap out the bases for small pools in order to give each player a refreshing reward every time they make it on to the field.

How to Design a Pergola : The Ultimate Guide

0
design a pergola

You probably have been thinking of designing an outdoor space that can provide shade from extreme weather conditions like sun and rain.  Yet you have no idea how best to do it. Pergolas, known initially as patio roofs, are a good choice.We are going to deep dive into how to design a pergola.

With a pergola, you can extend your home’s space by creating an outdoor shade for relaxing that is shielded from all undesired weather conditions like wind and rain. This architectural structure can be attached or detached from the main house, and it consists of beams, posts, and rafters.

How to design a pergola

How to design a pergola may vary according to the desires and preferences of homeowners.

It is essential to differentiate a pergola from a gazebo and a pergola. A gazebo is usually free-standing with a pitched roof, while a pergola has a flat roof.

A pergoba, on the other hand, has a solid top made up of slats. With the growing need for outdoor living spaces, a patio or pergola can increase the time you spend relaxing outside, entertaining yourself or guests with lovely views, and improving your home’s value.

If don’t have a opinion on how to design a pergola, this guide contains different ideas on designing a pergola to help you make informed decisions.

pergola designs

What you need to design a pergola

But first, you have to consider the following factors before you can design a pergola in most council areas.

Materials needed

It is essential that you first consider the material needed to appropriately design a pergola. Also, consider your budget and the financial implication of the materials in terms of their affordability.

Zoning laws

In this section, you will be asking yourself whether there are any county, city, or zone laws and approvals or licenses.

Ensure you have the necessary permissions from the relevant authorities before embarking on designing a pergola.

This process may be long or short, depending on where you live. Once you do so you can design the pergola you want.

Orientation

To design a pergola to fit your home’s esthetic, consider the orientation of your home. Here you are answering the question of where the pergola will face. Is it east-west, north, or south facing?

Budget

Designing a pergola will cost you. Depending on what you want, your design ideas will have different financial implications.

It is crucial to consider the cost factor of each before making a decision.

Consider who is going to design for you

You may choose to do it yourself or employ the services of an experienced contractor. Some pergola design ideas need a qualified and experienced contractor because of the complexities and technicalities involved.

In contrast, pergola design ideas are not that technical and can therefore be done by the homeowners themselves.

If you want to do it yourself, go for the design types that are not very complicated unless you have experience.

Building codes

Here you answered the question of who is going to design it. You may require the approval of a planning commissioner or a building instructor for most outdoor structures. There may also be local government guidelines on the heights of the outdoor facilities.

After looking at all these factors, you’re ready to start turning your outdoor space into a lovely relaxation area by making it a functional space.

All the pergola design ideas in this guide have differences in terms of style, size, budget, and materials needed.

Read on to learn more about pergola design ideas but first, let’s know how to design a pergola.

modern pergola designs

Actionable steps to design a Pergola

Many homeowners have been inquiring on how to design a Pergola, after realizing that they have an ample outdoor space that has not been fully utilized.

Well, if you are ready to start, we are here to help you by giving you step-by-step procedures discussed in detail.

Below is a step-by-step process on designing a Pergola.

Plan How To Use It

The first primary step is deciding how you intend to use the pergola. The main reason for creating this area is to provide an outdoor shade are.

This step involves determining the specific need for your new home area. It could be for dining purposes, a grilling area, or an oven for warmth.

It is crucial to plan the use so that you can be able to know what features you will include in your patio.

This is also necessary to help you as a homeowner decide the best location for your pergola, depending on the intended purpose.

You will also know the essential material required for construction. By planning on using your pergola, you will also easily select a design that best suits your needs.

How you will use your pergola will also help you determine whether you can design it yourself or you will need to employ the services of an experienced contractor.

Lastly, this step is vital in assisting homeowners to budget for their pergola. I am sure you can now see why this step is very crucial to appropriately design a pergola.

Decide on the Type of Pergola

Pergolas can either be free-standing or attached. Before designing your pergola, you must decide on the type that works well for you.

Your decision here will depend on the location of your pergola. If you want a tranquil, quiet, and lone pergola.  You will go for an area a further from your house.  In this case, you are going to design a pergola that’s free-standing.

The design you want for your pergola, in most cases, will also determine whether it is a free-standing or an attached pergola.

If you cannot easily decide on the type to go for, you can consider the advantages and disadvantages of each type and go for the most considerable among the two.

You can also view your budget before you can make your decision.

pergola design cost

Size Does Matter

Once you have decided on the type of patio you want, you have to determine the size of the area.

This step may not be any hard as you can choose based on the size of your outdoor space, your family, your budget, and the availability of materials needed.

You can make your decision based on the following popular sizes.

  • The small pergola is usually around 1 2′ by 1 2.’
  • Medium-sized pergolas are generally between 1 2′ by 16.’
  • Large ones generally of the size 1 2′ by 24.’
  • For a separate backyard pergola, the size is always around 1 2′ by 16.’

You can also use the need or the use of the pergola as a basis for selecting the best size. Go for what works best for you, depending on the factors named above.

Select a Vinyl cladding Color

You can agree with me that colors have a lot in determining the beauty and look of a place. This step is very vital as it will determine the overall look of your shade area.

You can choose a combination of matching colors or go for a single color. If picking a vinyl color is not easy, you can consider the color of your home exterior and use this as a basis of selection.

You can also go for your best color unless you do not have one, no pun intended. Another way of picking the vinyl color is talking to experts and home designers who will help you select the best color or color combination for your pergola.

The bottom line is always to consider the color of your home vinyl siding.

Extras

What features would you want your pergola to have? Different people will include different features in their patio.

Based on your choices and preferences, decide what should be included in your shade area.

Such extra features may include:
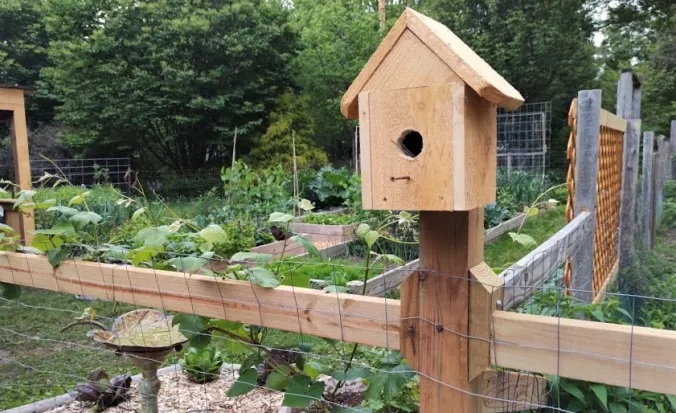
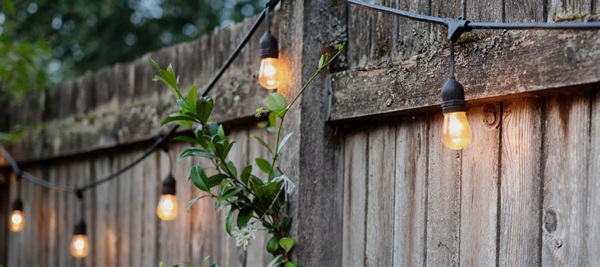
  • built-in lights
  • pillows and cushions
  • furniture like tables and chairs
  • and many more.

What will be included in your pergola may also depend on using the space and your budget.

Now that you have a fundamental idea of how you can design your pergola, you can proceed with the guide to select the best pergola design ideas that impresses you.

You can also start making arrangements to build your pergola by looking for a contractor and ordering the required materials.

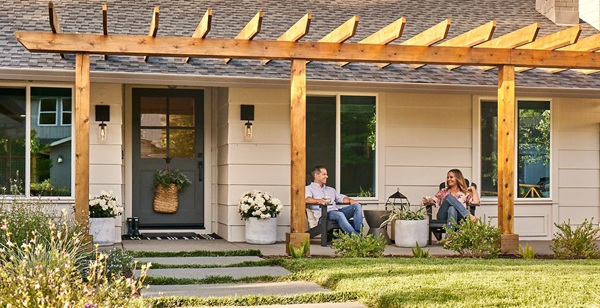
Light-Filtering Pergola

If you love watching the sun as it moves from the west to the east, this is the design for you.

This pergola design was designed in Nantucket. Massachusetts by Emeritus design & planning.

It is helpful for south-facing orientation. This pergola design helps homeowners create their outdoor space directly off the interior living areas.

From its name, the design filters sunlight into play but at the same time providing shade.

The filtered light allowed into the shade offers a perfect and lovely relaxing space that will increase your time outside the house.

The design also does a lot in improving the value and look of your home. This pergola is usually attached to the home, but you can also detach it, especially when designing it a little bit far from the house.

Watch the sun as it moves in the sky throughout the day from the east to the west while comfortably relaxing in your animate outdoor space.
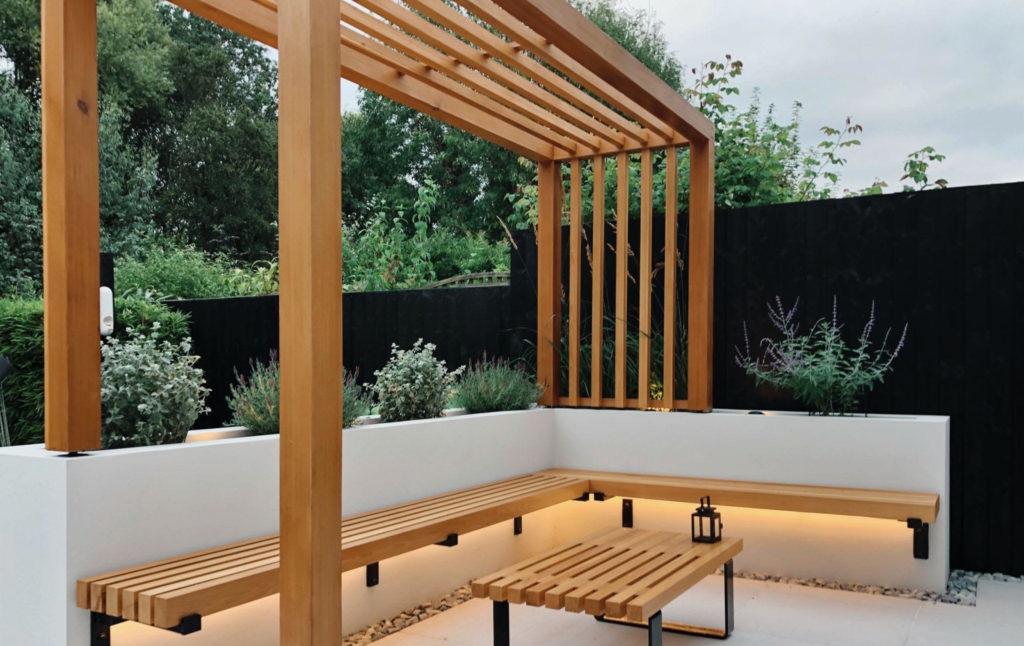
light filtering

Greenwich Pergola

This is an overhead practical and architectural pergola design that provides an outdoor shade with an intimate and lovely relaxation experience.

It is usually attached to the main house. The simple luminous pergola design offers a very distinct dining area and improves your home’s value.

Design your home with this pergola design and change the look of your outdoor space by making it a valuable space.

greenwich design

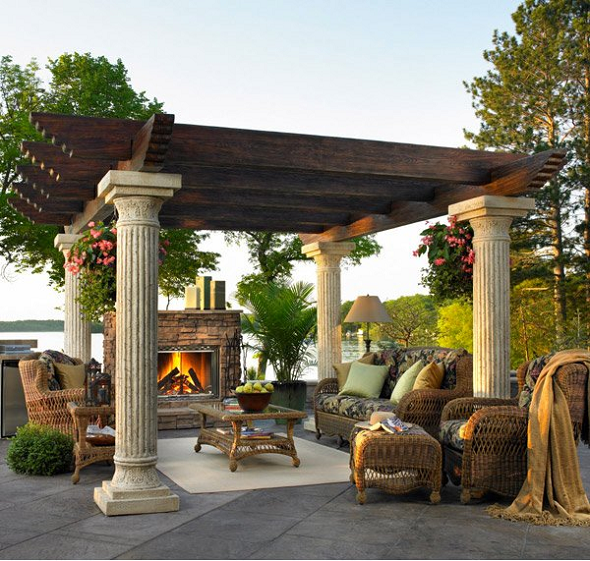
Cedar and Reclaimed Barn Wood

This is among the most beautiful pergola design ideas that not only provides shade by making your outdoor space very useful but also improves the value and appearance of your home.

The patio was designed in the 1920s in Chicago’s northern suburbs by the Studio Brunstrum team.

After completing interior renovations, the team used a natural cedar pergola trimmed with reclaimed barn wood and added a limestone patio to the home.

This design provides a vintage architectural look for your home. It is all-natural and lovely for an old-school design.

Cedar and Reclaimed Barn

Outdoor Dining

The Bay Area Custom Homes design was constructed in Atherton, California. The pergola design takes an arbor-like role as it is built between two outside walls.

The pergola supports vines hence acting as an arbor. This pergola design is beneficial in making maximum use of your outdoor space.

Desert Beauty Pergola Design

This is yet another lovely pergola design that is suitable and helpful for nature lovers. It is a simple natural architectural design that gives your home a natural look.

This plan will require you to employ experienced contractors like Elle interiors to handle everything from selecting the furniture and materials to the exact placement.

This Arizona design is suitable for the Arizona climate, with everything included creating an outdoor oasis and improved experience.

Creating a Tranquil Space

This design is suitable for warm climates where outdoor spaces are very much needed, just like interior designs.

Most people in such areas as California prefer spending more time in outdoor spaces because of the warm temperatures inside the homes.

The plan provides an excellent resting place for homeowners with a beautiful relaxation view.

The design is not that complicated, and you can do it yourself, especially if you have experience in pergola designs.

This California-based design makes use of thatch roofings to provide cool temperatures. These pergola design ideas are usually detached from the home, as you will have to first identify a quiet space for constructing your pergola.

Kitchen Pergola

It was first designed in Cleveland, Ohio, by 9th Avenue designs. It is a custom-built outdoor kitchen design with a pergola and a fireplace.

The pergola provides a lovely outdoor space for warmth while grilling and dining. You can consider this design for a family dining space.

It is usually attached but can also be detached, and experienced contractors will guarantee you a perfect plan other than doing it yourself.

Solid cover Pergola Design

This design from high craft builders is lighted by light strands to provide a wonderful evening and night relaxation.

The solid pergola is supported by posts sunk in the stone pedestals.

It is also an excellent consideration that makes maximum use of your outdoor space and turning your home into a lovely home.
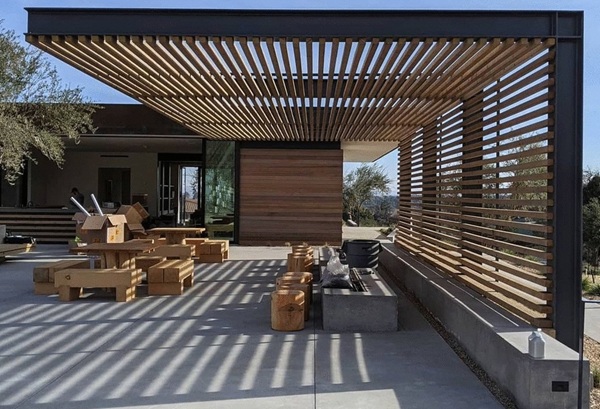
Modern Pergola

From the name, this is a modernized pergola design that may be attached or detached. It is also helpful in increasing the value of your home by turning your outdoor space into a lovely meditation and relaxing area.

This design from Perth, Australia, by Dale Alcock Homes is inspired by midcentury modern features, colors, materials, and styles to give your home a modernized look.

The pergola roof is made of panels with spaces to allow light into the area.

Midcentury Ranch Pergola

This design utilizes the outdoor space between the home and the garage area. It was designed by Elin Walters, a homeowner who decided to make good use of this space by creating a Pergola.

The pergola roof is made of plumbing pipes that allow light to pass through into the area.

She used a cement door to separate the pergola from the garage, and in the end, this outdoor space was turned into something magnificent for meditation and relaxing.

Wild West Pergola Design

It was designed by the Carlson design group and built by Caroll and strong builders in Santa Lucia, California.

The pergola roof is made of tiles. It has a rustic vintage look that is very lovely. The pergola may be attached or detached.

The complexities and technicalities of the design require the services of qualified contractors for a quality look.

The outdoor space is turned into a lovely and quiet space for meditation and relaxing while improving your home’s view and value.

Pergola Roof Designs

The roof type selected is significant in determining the overall look of your pergola. There are very many pergola design types, each with different pergola-roofs.

The pergola roofs selected will, in most cases, depend on the use of the shade and the homeowners’ preferences.

While others will prefer pergola-roofs that allow filtered light into space, others will go for pergola-roofs that do not let light through.

Others may prefer thatched pergola roofs made of natural trees that provide a calm space, especially for warm climates.

Your budget, in most cases, will also determine the pergola roof you settle for because different pergola-roofs have different financial implications.

Also, different design types have different roof types, and therefore the pergola roofs will also vary depending on the design type selected.

The following are some of the pergola roofs that you can choose from.

Static Panels or Fabrics for Aesthetics

The pergola roof is transparent, providing shade from rain and sun while at the same time allowing light into the shaded area:

This roof type also will enable homeowners to quickly know if there are fallen debris and dirt on them and clean them because they are clear. They are also not expensive.

Louvered Roof Pergolas

This commercial roof type allows homeowners to adjust them according to the conditions required;

This means they can be fully opened or fully closed. The price of this roof types is somehow high compared to the static panels.

Other pergola roofs include ShadeFX, Retractable canopies, and Roll retractable awnings, all with different suitability, functions, and prices.

It’s only wise that you research each roof type and decide on the most suitable one for you in your area.

Our Final Thoughts

We hope that this ultimate guide has answered all your questions regarding pergolas in terms of different pergola designs, how to design a pergola, different pergola roofs available, and what you need to consider before designing pergolas.

Remember to design a space that you can enjoy with friends and family.

How to Design a Backyard with a Hot tub

0
hot tub designs

Having a backyard can be a lot of fun.  You literally can do what ever you want out there (If you own it).  So if you want a backyard with a hot tub then lets look at how you can design one.

If you are dreaming of owning a hot tub? There’s nothing better than coming home after a hard day and soaking your stressed muscles in those luxurious bubbles. So, what’s holding you back?

What stopping you

Do you feel like your yard is too tiny? You’re thinking, “Hot tubs small backyard, that seems difficult.” We looked at adding a backyard hot tub and the things you need to consider before purchasing.

This time we want to explore how to design a backyard with a hot tub. Your dreams of designing a backyard with a hot tub can become reality. All you need is a plan.

You’ll need to consider a few things first:

  • Are there any existing structures that need to be accounted for?
  • Where would you put it?
  • How much is it going to cost you?

There is a plethora of deck and hot tub designs to choose from as well. So, it’s time to make some decisions.

With careful planning and preparation, you will be on your way to hot tub bliss in no time.

backyard with a hot tub

Measuring and Planning

What does your backyard look like now? First, grab some graph paper. Begin to create a drawing of the existing shapes and dimensions. They should be to scale.

Don’t worry, this doesn’t need to be a masterpiece. Just make sure to include all the basic information.

You should include essential structures such as your garage, patios, driveway, and fence.

Also, make sure to note any large trees that live in your yard. These are things that cannot be moved easily.

Make a note of any vegetation that exists as well. Don’t forget about things like bushes, flower gardens, and fountains.

These items can be relocated if need be. Being mindful of your layout is the first step toward planning for your project.

Additionally, it helps to make several copies of your graph blueprint. Also, remember to take as many photos as you can. Take them from every possible angle in your yard.

Fitting your hot tub and deck into your yard may require some tweaking, but it will be so worth it.

Existing Structures

Do you currently have a deck or patio in your yard? What kind of condition is it in? If it is poor quality, you may need to remove it completely. You may consider repairing it though.

However, if it is in good condition, you’ll need to figure out how to incorporate it into your plan.

It’s essential to find out if your existing deck can handle the weight of a full hot tub. You need to allow for hot tub weight, people and water.

You should also figure out where you’re going to get your power from. Take note of any power outlets that may be available to you.

You could install a new electrical line, but if that seems costly.  You might consider solar energy. Several hot tubs can operate with solar instead.  A lot of houses are moving toward batteries to power the house.

Dream Hot Tub Designs Backyard

Now, we’ve come to the fun part! You can begin to sketch out your dream. This is why you made copies of your scale drawing.

Begin drawing a picture of how you’d like your backyard oasis to look when your project is completed.

Take note of how the entire yard will appear. This is important since you’ll need it to look great, but you also want it to have a function.

Use each copy to create several unique hot tub designs backyard. You’ll need a few options to choose from.

Afterward, you can check the designs against your photos. This is a great way to avoid potential construction issues.

Plus, you can begin to wrap your head around how it will look when it’s done.

After that, start browsing around your local home stores. You can check out what type of materials and products they provide.

It’s helpful to do online research as well. This will keep you up to date on the latest hot tub designs and trends.

Once you find your dream hot tub model, you’ll be able to fully envision the end result. However, don’t get ahead of yourself.

You are just making a plan. Don’t purchase anything at this point.

Outsourcing if needed

If you’re stressed about your design, try consulting a professional. There are contractors out there that will gladly take a peek at your concept.

They will be able to identify any possible issues and help you plan it in more detail.

Since you already created a design concept, you will save some cash. All the contractor will need to do is finalize the design and work from your concept.

Understanding the Costs

It’s easy enough to understand how much a new home or car will cost, but hot tubs are a little different.

There are several factors that can affect the cost of installing and maintaining it.

Cost Factors to consider:

  • Shipping/landed cost
  • Design
  • Custom Models
  • Size
  • Materials

Obviously, hot tubs that are made with quality materials will cost more. If you customize your model, your costs can increase as well.

Additionally, you must decide whether you want to buy from a local retailer or not. Buying local will save you time, stress, and money.

However, this isn’t always a viable option. That’s where online shopping comes in.

The size of your hot tub will also be a factor. Luckily, you’re probably looking at smaller models since you’re fitting it into a tinier yard.

This will also save you money in the long run. Smaller models use less water. Plus, they require less electricity. It’s a winning situation if you think about it.

Hot Tubs Small Backyard / Check Your Local Laws

This is the part that many of us dread. However, it’s an important step. You’ll need to check with your local zoning laws before you finalize your design and purchase your hot tub.

This is vital because you don’t want to get halfway through your project and then realize that you need to change something.

That would be a waste of time and money. Many people finish their project and then get reported for violating zoning ordinances. So, save some headaches and stay informed.

Our Final Thoughts

Designing a backyard with a hot tub doesn’t have to be difficult. By following the steps listed above, you’ll get through it hassle-free.

Try enjoying the creative process! You’re finally turning your dream into a reality. Before you know it, you’ll be relaxing with a cold drink in your new hot tub.

Fertilizing Your Lawn – The Ultimate Guide to Using Fertilizer

0
general garden fertiliser

Fertilizers give your lawn the food it needs to stay healthy and full of life. Just like people need vitamins, grass needs nutrients to grow strong.  We want to share our ultimate guide and tips for fertilizing your lawn.

What do Fertilizers do ?

Fertilizing helps your lawn grow thicker, greener, and softer underfoot. It also makes the grass tougher, so it can handle hot days, dry weather, and regular use without looking tired or patchy.

In short, fertilizer keeps your lawn looking fresh, green, and welcoming all year round.

lawn fertilizer

What’s in a Fertilizer?

Most lawn fertilizers contain three main ingredients, often called the “big three” nutrients:

  • Nitrogen
  • Phosphorus
  • Potassium.

With each one plays a special role in keeping your grass healthy.

Nitrogen (N)

This nutrient is like fuel for your lawn. It helps the grass produce chlorophyll—the green pigment that allows plants to capture sunlight and turn it into energy through photosynthesis.

With enough nitrogen, your lawn grows thick, lush, and a rich green color.

Phosphorus (P)

Phosphorus focuses on what’s happening underground. It encourages strong root growth and helps new grass establish quickly.

Healthy roots mean your lawn can better absorb water and nutrients, making it stronger from the base up.

Potassium (K)

Often called the “protector,” potassium makes your lawn more resilient. It strengthens the grass so it can better handle stress from drought, disease, pests, or heavy foot traffic.

Think of it as a shield that keeps your lawn tough and healthy.

Together, these three nutrients, commonly shown on fertilizer labels as the N-P-K ratio—work as a team to keep your lawn green, strong, and ready to handle whatever nature throws its way.

When Should You Use Fertilizer?

Timing really matters when it comes to fertilizing your lawn. Feeding your grass at the right times of year will keep it green, strong, and able to handle whatever the seasons throw at it.

Spring (the most important time)

When soil temperatures reach about 55°F (13°C), your grass begins to grow again after winter. This is usually when flowers start blooming.

Fertilizing now jump-starts growth, helping your lawn turn thick, green, and healthy. For best results, aerate your lawn first, this loosens the soil so water, air, and nutrients can reach the roots more easily.

Summer (maintenance feeding)

Summer brings heat, foot traffic, and sometimes dry spells, which can all stress your lawn. A lighter feeding during summer helps grass stay strong and green, but be careful not to over-fertilize in hot weather, as this can burn the lawn.

Look for a slow-release fertilizer to provide steady nutrition without overwhelming your grass.

fertilizing lawn in winter

Fall (recovery and preparation)

Fertilizing in fall is just as important as spring. After a long summer, your lawn needs a boost to recover from stress and prepare for the cooler months.

A fall feeding helps build deep, strong roots, making your lawn healthier through winter and ready to grow back quickly when spring returns.

By following this seasonal routine, spring for growth, summer for strength, and fall for recovery.  You’ll keep your lawn lush, resilient, and beautiful all year long.

What Type of Fertilizer Should You Use?

When it comes to choosing fertilizer, the best option for most lawns is a slow-release fertilizer.

Unlike quick-release formulas, which dump a large amount of nitrogen into the soil all at once, slow-release fertilizers feed your lawn gradually over time.

This lowers the risk of “burning” your grass from too much nitrogen and keeps growth steady instead of patchy or uneven.

Another bonus is convenience—because nutrients are released slowly, you don’t have to apply fertilizer as often.

Slow-release fertilizers are available in both granular and liquid forms, but granular is usually the easiest to spread evenly across a lawn.

When shopping, look for a balanced formula with an N-P-K ratio that matches your lawn’s needs (with nitrogen being the most important for lush, green growth).

How Much Fertilizer Should You Use?

Every lawn is different, but fertilizer needs are usually measured by how much nitrogen your grass requires each year.

As a general rule, most lawns need between 1 and 6 pounds of nitrogen per 1,000 square feet per year.

The exact amount depends on the type of grass you have, your climate, and how often your lawn gets stressed by things like heat, drought, or heavy use.

Here’s a helpful tip

if you leave grass clippings on the lawn after mowing, they naturally decompose and return nitrogen to the soil.

This can reduce your fertilizer needs by about 1 pound of nitrogen per 1,000 square feet each year—saving you both time and money.

By choosing a slow-release fertilizer and applying the right amount, you’ll keep your lawn healthy, green, and low-maintenance without the risk of overfeeding.

before and after lawn fertilizer

What Is the Best Fertilizer to Use?

There are many fertilizers on the market, but here are a few reliable options that work well for most home lawns:

Miracle-Gro All Purpose Food – A well-known brand that provides balanced nutrients for a wide variety of plants and lawns.

Scott’s Turf Builder Lawn Food – Specifically designed for lawns, it strengthens grass and improves its ability to absorb water and nutrients.

Earth Science Moorganite – delivers rich, green growth and vibrant plants, turning your yard into a dreamscape.

When choosing a fertilizer, look for a slow-release formula. This type feeds your lawn gradually, preventing nutrient overload and reducing the number of applications you’ll need each year.

How Do You Apply Fertilizer?

While you can scatter fertilizer by hand, it’s not the best method.  It can often lead to uneven coverage.

Instead, use a garden spreader to distribute fertilizer evenly across your lawn:

For smaller lawns, a handheld spreader is convenient and easy to control.

For larger lawns, a broadcast or drop spreader (the kind you push like a cart) is more efficient.

No matter which spreader you choose, follow these key steps:

  • Spread evenly – Walk at a steady, consistent pace to avoid applying too much in some areas and too little in others.
  • Start with the edges – First apply fertilizer around the perimeter, then work your way toward the center in straight lines.
  • Check the weather – Don’t fertilize right before heavy rain, as it can wash nutrients away.
  • Clean up spills – If fertilizer lands on driveways, sidewalks, or paths, sweep it up. Otherwise, it may wash into storm drains and harm rivers or streams.
  • Water after application – Once you’ve finished spreading, water your lawn thoroughly. This helps the fertilizer soak into the soil and prevents the grass from burning.

With the right amount, the right fertilizer, and the right method of application, your lawn will grow thicker, greener, and healthier season after season.

Fertilizing your lawn

Can You Over-Fertilize?

Yes, absolutely you can. Adding too much fertilizer, or applying it too often, can actually harm your lawn instead of helping it.

When excess fertilizer builds up in the soil, the salt content increases, which can “burn” the grass.

The results are easy to spot: yellow or brown patches, streaking, or thinning grass that looks worse than before you fertilized.

The key is balance, apply the right type, at the right time, and in the right amount.

Watering and Fertilizer

Water plays a big role in how much fertilizer your lawn needs. The more you water, the faster nutrients get used up or washed through the soil.

If you use an automatic sprinkler system.  Then fertilize about every 6 weeks during the growing season.

If you water by hand or less often. then fertilize about every 8 weeks instead, since your lawn won’t lose nutrients as quickly.

Tip: Always water lightly after applying fertilizer to help it soak into the soil and reach the roots—but don’t flood your lawn.

What You Shouldn’t Do

  • Don’t fertilize on windy days – Wind can blow fertilizer away, leading to uneven coverage or wasted product.
  • Don’t apply near waterways – Fertilizer can wash into streams, rivers, and lakes, polluting the environment.
  • Don’t overwater after fertilizing – Too much water can wash fertilizer away before it has a chance to benefit your lawn. A soaker hose or gentle sprinkler is best, as it allows water to penetrate deeply into the soil.

What You Shouldn’t Do

  • Don’t fertilize on windy days – Wind can blow fertilizer away, leading to uneven coverage or wasted product.
  • Don’t apply near waterways – Fertilizer can wash into streams, rivers, and lakes, polluting the environment.
  • Don’t over water after fertilizing – Too much water can wash fertilizer away before it has a chance to benefit your lawn. A soaker hose or gentle sprinkler is best, as it allows water to penetrate deeply into the soil.

Fertilizing your lawn and plants doesn’t have to be complicated. With the right products and a little care, you can enjoy a vibrant, green lawn that’s the envy of the neighborhood all year long!

How to puppy proof your backyard

0
puppy proof backyards

Bringing a new puppy home can be an exciting time for your family. It can also be scary and uncertain. There are many hazards in the average home that can create dangerous situations for your puppy. Backyards can be especially tricky, so taking steps to secure your yard before the puppy arrives is one of the best ways to have a puppy proof backyard.

Start With a Good Fence

A good puppy proof fence is your first line of defense when it comes to having a puppy proof backyard.

Make sure the puppy proof fence is sturdy with no holes or means of escape. Make sure the dog can’t go under, through or above the fence.

Is the fence so low that he can jump over it? Are there holes or gaps large enough for him to squeeze through? Can he tunnel under the fence and leave?

Making sure your fence is secured will keep your puppy from being able to leave, and it will also keep other stray animals from getting in and hurting your dog.

If you have outdoor furniture in your backyard, make sure the puppy can’t use this furniture as a means of escape.

Furniture and Fence Maintenance

You don’t want the puppy to be able to use the furniture as a boost to climb over the fence and out of the yard.

Remove all grills, tables and chairs from the perimeter of the yard so the puppy can’t climb them and escape.

Regularly check the latches on all of your gates to make sure they are secure. Puppies can often open gates that are not properly secured, so make sure your latches are tight. Another hazard to your puppy is strangers in the yard.

If you are going to have landscaping workers or household staff in and out of the house and the backyard, make sure they know how to properly latch the fences and gates to keep your puppy safe.

Not all fences are created equal. Chain link fences often work best because dogs can’t chew through them, and the holes are not large enough for most puppies to squeeze through.

Fences with decorative spikes on them can be dangerous because dogs can jump on them and get impaled. Most experts recommend flat-edged fences for families with dogs or small puppies.

puppy proofing yards

Secure Bodies of Water

Pools, ponds and standing water can be fatal to a puppy. While most dogs are good swimmers, it can be dangerous for the puppy to fall into the pool or a pond.

If you have pools or ponds in your backyard, secure them with a fence that is too high for the puppy to climb.

If it is not possible to build a fence around the pool, keep the dog contained to an area away from the pool.

Many pool fences are not secure enough to keep the puppy out, so make sure there are no gaps that the puppy can squeeze through and fall into the water.

A puppy proof fence can prevent injury or death around bodies of water.

It is also helpful to search your yard for areas in which the ground is uneven and can create large puddles after a rainstorm.

These standing water areas can not only pose a fall hazard, they can also attract insects that can sting your dog.

Install drain systems to ensure that standing water doesn’t pose a problem for your puppy.

Don’t Create a Habitat for Predators

One of the most important factors when you are attempting to maintain a puppy proof backyard is to keep predators at bay.

Snakes love hiding out in tall grass, piles of hay, wood shavings, compost heaps and in holes.

Keep the grass cut and regularly move any debris that can create a habitat for snakes. Toads love water and pet food.

Avoid feeding your dog outdoors as this can attract not only toads but rats that can attack and harm your puppy. Keep all garbage cans closed and in airtight containers to ward off raccoons and foxes.

These animals lurk around at night foraging for food, so it can be wise to keep your puppy inside at night.

Make sure your puppy proof backyard is a haven for the puppy but an inhospitable place for predators.

If you’re wondering how to puppy proof your backyard, one of the best ways is to keep other animals like raccoons, stray dogs and foxes out to prevent an attack on your dog.

puppy proofing yards

Remove Toxic Plants

Puppies are naturally curious and will gnaw on anything in their vicinity. This includes toxic plants that can injure or kill them.

There are quite a few plants that are toxic that you should remove from your puppy proof backyard. These include, but are not limited to:

  • Apples
  • Oleanders
  • Tulips
  • Peonies
  • Geraniums
  • Rhododendrons
  • Mushrooms
  • Carnations
  • Daisies
  • Lilies
  • Shamrocks
  • Wisteria
  • Poison Ivy
  • Hydrangea

Search your puppy proof backyard for these plants and get rid of them before the puppy arrives to play in his new backyard.

There are more comprehensive lists available that will warn you of every substance that has been known to be harmful to pets.

If the puppy does ingest one of these plants, contact your vet immediately.

Lock Away Chemicals and Hazardous Materials

Keep any fertilizer, weed killer, propane, lighter fluid, candle oil, bleach or cleaning supplies in a locked shed where the puppy cannot access them.

If you are confused about how to puppy proof your backyard, crawl around on your hands and knees and get a real view of what your dog will see.

If you spot any harmful chemicals, rest assured that your puppy will also spot them and try to test them out.

Some chemicals can kill or injure your puppy, so be sure to lock them up and keep them out of reach.

Puppies like to chew. Exposed wires, outdoor furniture and garden hoses can look like a tasty snack to a puppy, so it’s crucial that you secure these and keep them out of puppy’s reach.

Enjoy a puppy proof backyard by finding any brightly colored items at the dog’s level that might draw his attention.

adding puppy proof fence

Keep Your Puppy Safe From Cars

Your puppy proof backyard can extend to other parts of your home if your backyard is in the same vicinity as your garage.

Keep your puppy safe by placing a barrier between the dog’s play area and the area where cars are in motion.

Playful puppies can easily run in the path of a moving car, so keep him in an area with a puppy proof fence.

If there is going to be a lot of activity in the garage area, like cars moving in and out frequently, it is best to keep the puppy inside the house.

Never let the puppy roam alone in the front yard. Puppies can be quick and dart out into traffic before you get a chance to stop them.

When you are out with the puppy in a space that is not enclosed by a fence or a gate, make sure to keep him on a leash at all times.

Provide Adequate Shade and Water

While your puppy will love wide, open spaces to run and play, he will also need a place where he can be protected from the elements.

Dehydration can set in quickly in a puppy.  Make sure he has a shady area with adequate fresh, clean water.

Trees often don’t provide enough protection from the sun. It helps to build a structure that he can go inside to protect him from the elements.

Make sure this shelter is away from any wires, generators, appliances or grills.  That will ensure that the dog’s sleeping space is safe.

Beware of Fire

When thinking of how to puppy proof your backyard.  Most people forget about how dangerous fire can be.

Barbecue grills are a staple of most backyards, and many people own fire pits that are great for cool evenings but can be fatal for dogs.

When you are figuring out how to puppy proof your backyard.  Make sure to secure all sources of fire when the puppy is around.

This means extinguishing your grill immediately and keeping it out of reach of the dog. Keep fire pits covered and never leave them burning unattended.

Visitors to Your Backyard

This hazard is not one that often comes to mind when we think about a puppy proof backyard, but visitors can pose a real danger to your puppy.

Neighborhood children who know you have a puppy may come into your yard to play with him without your knowledge.

Visitors to your yard may not know you have a puppy and inadvertently let him out of the yard. Well meaning family members and friends may feed your puppy harmful foods or play with him too roughly.

When it comes to inviting visitors into your yard, make sure they understand how to handle your puppy properly.

Check your yard often for children’s toys that can pose a choking hazard to your puppy. If the kids are playing outside, they may leave their small toys, balls or balloons outside with the dog.

Puppies love to chew, and they don’t know the difference between harmful children’s toys and their own safe toys.

Plastic blocks, hair accessories, bubbles and puzzle pieces are brightly colored. They are likely to attract the attention of a curious puppy.

These toys can create a hazardous situation.  Just be careful to make sure that they are thoroughly cleaned up after play time outdoors.

puppy fencing in the yard

Create a Dog Run

If all else fails and you can’t completely puppy proof your backyard.  You can create a separate area just for him.

Using a chain link fence, section off a portion of your backyard.  Just make sure that you  give him adequate space to run and play.

This area should be off limits to everyone but the puppy to prevent hazardous materials from getting in.

When it comes to learning how to puppy proof your backyard.  Trying to understand the possible hazards and taking steps to prevent them is the first step.

For some that means simply installing a puppy proof fence to keep the puppy in and predators out.

It could be others it may mean building an enclosure to keep him from falling into the pool. For some families, puppy proofing means buying a shed to lock away hazardous chemicals and tools.

Having the right puppy proof backyard is a matter of understanding the hazards lurking in your yard.  Then fixing them so that your puppy has a safe and comfortable place to play.

Growing All Things: Your Ultimate Guide to Fresh Herbs, Elevated Garden Beds & Indoor Vegetables

0
growing all things

Gardening should be a joyful and rewarding activity that can transform any space.  It doesn’t matter if its indoors or outdoors, into a lush, productive oasis. Growing all things in your backyard is possible with some planning and thought.

From fresh herbs elevated garden beds to growing vegetables indoors, this guide will help you get started and flourish with ease.

growing herbs in pots

Fresh Herbs: Flavorful and Easy to Grow

Growing fresh herbs from seeds adds vibrant flavor to your meals and brightens your garden.

Why Grow Fresh Herbs?

  • Minimal gardening effort required
  • Perfect for indoor or outdoor settings
  • Adds fresh, nutritious flavor to dishes
  • Many herbs are perennial, providing harvests year-round

Popular Herbs to Grow

  • Thyme
  • Basil
  • Rosemary
  • Mint (including varieties from mint seeds)

growing herb tips

Tips for Growing Herbs

  • Start small and expand as you gain experience
  • Use garden containers or outdoor beds depending on space
  • Grow herbs along pathways or companion plant with flowers and veggies
  • Regularly prune and divide herbs to encourage fresh growth

Elevated Garden Beds: Gardening Made Comfortable and Efficient

Elevated garden beds make gardening easier on the back and hands while promoting healthier plants.

Benefits

  • No need to bend or kneel—garden while standing
  • Improved drainage and soil aeration
  • Better moisture retention for roots
  • Customizable shapes and sizes

Building Tips

  • Use pest- and weather-resistant materials like stone, brick, or treated wood
  • Avoid toxic timber treated with harmful chemicals
  • Ensure beds are open at the bottom to connect with natural soil
  • Follow usual fertilizing and liming routines

Growing Vegetables Indoors: Fresh Harvests Year-Round

With the right setup, indoor vegetable gardening can provide fresh produce regardless of season.

Essentials for Indoor Growing

  • Light: High-intensity grow lights are crucial for fruiting vegetables
  • Humidity: Maintain proper moisture levels
  • Air Circulation: Prevents disease and strengthens plants
  • Temperature: Keep steady, appropriate temperatures

Getting Started

  • Begin with easy greens like lettuce and spinach
  • Choose suitable containers and soil mix
  • Monitor light and humidity closely
  • Be patient and consistent

growing vegetable in containers

Garden Containers: Creative Solutions for Every Space

Almost any container can become a garden pot, but drainage and material matter.

What to Look For

  • Drainage holes to prevent waterlogging
  • Appropriate size based on plant root system
  • Light colors to keep soil cooler in warm climates

Popular Container Materials

MaterialProsConsTips
WoodInsulates roots, DIY friendlyNeeds pest/weather treatmentUse treated wood safe for plants
MetalDurable, strongConducts heatLine with plastic to protect roots
PlasticLightweight, flexibleCan be less breathableChoose flexible, high-quality plastics


Container Care Tips

  • Use houseplant soil mix, not heavy garden soil
  • Water thoroughly and feed regularly
  • Prune plants to encourage growth
  • Containers work well indoors and outdoors

Mint Seeds: Your Go-To Herb for Easy Growing and Fresh Flavor

We love mint as it is a versatile and aromatic herb, perfect for indoor or outdoor gardens.  We’ve done a deep dive into growing mint seeds before.

Here is a quick summary:

Mint Varieties

  • Peppermint
  • Spearmint
  • Apple Mint
  • Pineapple Mint

Growing Mint Successfully

  • Grows 2-3 inches tall and spreads quickly
  • Thrives in garden containers year-round
  • Releases fragrant scent when leaves are touched
  • Plant indoors in late winter or outdoors in spring
  • Hardy perennial that tolerates planting until 2 months before frost

Whether you’re growing fresh herbs from mint seeds, planting in elevated garden beds, or cultivating vegetables indoors, the possibilities are endless.

With the right knowledge and tools—like garden containers and proper lighting—you can enjoy a thriving, beautiful garden no matter your space or skill level.

Growing Fresh Herbs: A Simple Guide for Delicious Results

0

Growing fresh herbs is a rewarding and fun way to enhance your cooking and enjoy fresh flavors year-round. Whether you have a sunny windowsill, a small patio, or a garden space, growing fresh herbs is simple and satisfying.

Fresh herbs not only add vibrant taste to your dishes but also bring health benefits and decorative beauty to your home.

We looked at Fresh Herbs and home gardening tips in this article before.  Now we want ot deep dive into some of the hers you can grow at home.

Here’s a beginner-friendly guide to some of the best herbs to grow and how to care for them.

Why Start Growing Fresh Herbs?

  • Fresh herbs improve the flavor of your meals naturally.
  • They are packed with nutrients and antioxidants.
  • Growing herbs at home saves money and reduces trips to the grocery store.
  • They add beauty and fragrance to your kitchen or garden space.

growing herbs

Best Herbs to Grow at Home

When it comes to the best herbs to grow at home, some stand out for their ease of care, versatility, and flavor.

Basil is a favorite for many cooks, thriving indoors or outdoors and adding a fresh, aromatic touch to a wide range of dishes.

Mint is another popular choice, known for its vigorous growth and refreshing taste that’s perfect for teas and desserts.

Chives offer a mild onion flavor and grow quickly, making them ideal for beginners.

Rosemary, with its fragrant needles and robust flavor, is perfect for sunny garden spots and pairs well with meats and roasted vegetables.

These herbs are not only simple to grow but also bring a wealth of culinary possibilities right to your kitchen or garden.

Basil

Basil is a versatile herb perfect for Italian dishes, salads, and even chicken recipes.

  • Grows well in pots on a sunny windowsill or in a semi-shaded garden area.
  • Keep the soil moist but avoid waterlogging.
  • Pinch off leaves regularly to promote bushy growth.

Mint

Mint thrives in shaded areas and spreads quickly, making it a great choice for teas and garnishes.

  • Plant spearmint or peppermint in pots or a contained garden bed.
  • Prefers partial to full shade and consistently moist soil.
  • Control its spread by growing in containers.

Chives

Chives add a mild onion flavor to dishes and are very easy to grow.

  • Grow chives from seed or starter plants in shaded or semi-shaded spots.
  • Harvest leaves regularly to encourage new growth.

Divide clumps every few years for plant health.

Rosemary

Rosemary loves sunny spots and adds a fragrant, savory flavor to many recipes.

  • Plant rosemary in the sunniest part of your garden or patio.
  • Water sparingly; rosemary prefers well-drained soil and drier conditions.
  • Regular trimming promotes bushier plants and more leaves.

Tips for Successful Growing Herbs

  • Use pots with good drainage for indoor herbs.
  • Space garden herbs about 12 inches apart to allow room for growth.
  • Avoid overwatering to prevent root rot, especially indoors.
  • Harvest herbs frequently to keep plants healthy and productive.
  • Rotate pots regularly so all sides get sunlight evenly.

So Start Growing Herbs Today!

Growing herbs at home is a simple way to enjoy nutritious, flavorful ingredients straight from your garden or kitchen.

With minimal care, you can cultivate basil, mint, chives, rosemary, and more, adding freshness to your meals and beauty to your space.

Visit your local garden center for seeds or starter plants and start growing fresh herbs today!

Build a Backyard Shed – How To Plan For Your Shed

0
build a backayrd shed

If you are wanting to build a backyard shed.  There are certain processes that need to be followed.

First decide if  you’re building a DIY shed or you’re using a contractor.

Steps to building your backyard shed.

Council Approval has to be obtained. If you are using a qualified builder who specializes in sheds, they will generally do that for you.

A certifier has to approve the work. Once again your builder will have the right contacts for that.

There may be the need for some earthworks to prepare the site where the shed is being built.

Usually that is an extra cost to the homeowner. In most cases your shed contractor will have a firm who he is used to working with to do that work.

However if you have a contact of your own then it will be up to you to organize them.

Naturally if you wish to have a powered shed then the homeowner is responsible for engaging the electrical contractor.

That is something that can be done after the shed has been built and approved by the certifier.

Sheds come in a variety of sizes and it’s important to determine if the size that you would like is able to be built in your back yard.

building a backyard shed

Decisions you need to make before building

  •  If you wish to have it insulated.
  • How many windows you would like in it.
  • How many doors are required?
  • Where you would like it positioned so that you are able to access it easily.

In a typical shed 9 meters by 5 meters, a window 90×1510 is the usual size.

There will be one personal access door of standard size of 2040×820 and one roller door 2.8×3.6 meters which will gives ample access and light.

The floor will normally be concreted but that is usually included in the price of the quote from your builder.

Don’t forget to vermin proof

The contractor usually include vermin proofing in the build.

Most shed come in kit form. They are built to cyclone standards in the Southern Hemisphere, and tornado proof for the Northern Hemisphere.

In some areas they are required to be snow proofed.

Usually the contractor will ask for a 10% deposit upon signing of the contract. That is standard practice.

Sheds come in several colours and you will be given a choice as to what colour you would like.

Most contractors will encourage you to select a colour that will blend in with your house colour.

At the end of the day when you build a backyard shed. Its important to plan to make sure you get what you want and need in your backyard.